Removal and Replacement
Door Hinge Overview
• The illustration shows a right door hinge. The left door hinge is identical.
• Always replace the door hinge bolts after loosening them.
• Hinges are no longer manufactured as separated parts.
• Lubricate the new door hinge if the old one was replaced.
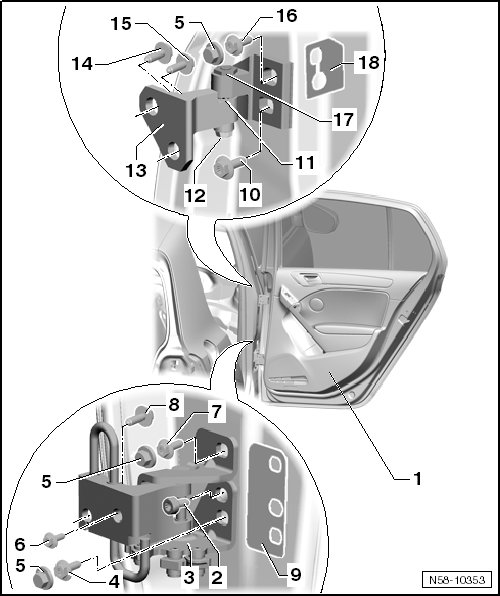
1 Door
• Removing and installing, refer to => [ Door ] Rear Door.
• Adjusting, refer to => [ Door Adjusting ] Adjustments.
2 Guide Bolt
• Tightening specification: 10 Nm
3 Door Hinge with Door Arrester
• lubricate if the hinge is replaced, refer to => [ New Door Hinge, Lubricating ] Procedures.
4 Socket Head Bolt
• Tightening specification: 38 Nm
• Always replace bolts after loosening them.
5 Cover
6 Socket Head Bolt
• Tightening specification: 50 Nm
• Installed from the inside of the vehicle.
• Always replace bolts after loosening them
7 Socket Head Bolt
• Tightening specification: 38 Nm
• Always replace bolts after loosening them.
8 Socket Head Bolt
• Tightening specification: 50 Nm
• Always replace bolts after loosening them.
9 Lower Spacer Plate
10 Guide Bolt
• Tightening specification: 10 Nm
11 Adjustment Ring
• Provides the eccentric pin adjustment range.
12 Bolt
• Tightening specification: 28 Nm
• For the eccentric bolts.
13 Door Hinge
• The door hinge is not separated.
• lubricate if the hinge is replaced, refer to => [ New Door Hinge, Lubricating ] Procedures.
14 Socket Head Bolt
• Tightening specification: 50 Nm
• Always replace bolts after loosening them.
15 Socket Head Bolt
• Tightening specification: 50 Nm
• Always replace bolts after loosening them.
16 Socket Head Bolt
• Tightening specification: 38 Nm
• Always replace bolts after loosening them.
17 Eccentric Bolts
• The eccentric bolts are for adjusting the gap.
18 Lower Spacer Plate